


Communicating Tooth Shade For Success
- David French

- May 20, 2020
- 3 min read
How to Communicate Shade to the dental lab in a way that will Increase Patient Wow Factor and Your Bottom Line
At DenTech Dental Laboratory a common question that we receive is, “How can I effectively communicate a shade without sending the patient to the lab ?”
This article will share some basic tips that will provide you with excellent results and will enhance the predictability of your restorations shade results.
Basics of shade taking that I will focus on:
1. When is the best point in the prep appointment to take the shade?
2. Positioning the camera relative to teeth.
3. How to position the shade tabs.
4. Light sources are critical.
5. The importance of capturing an image of the prep shade.
1.The best point in time to take shade.
ALWAYS take your shade at the very beginning of the prep appointment.
During the prep appointment, the patients' teeth become dehydrated and can lighten one shade level or more. If you wait until the end of the appointment you will tend to record shades that are too bright, compared to the natural shade of the patients’ teeth.
2. Camera angles.
It is important for shade communication, to position the lens of the camera on the same horizontal plane as the facial surface of the teeth. Almost perpendicular, but slightly from the right or left to reduce glare. Take the shade with the patient sitting up, eye to eye. Often shades are taken while patients are somewhat reclined in the dental chair. Try sitting them in the assistants' chair, or standing.

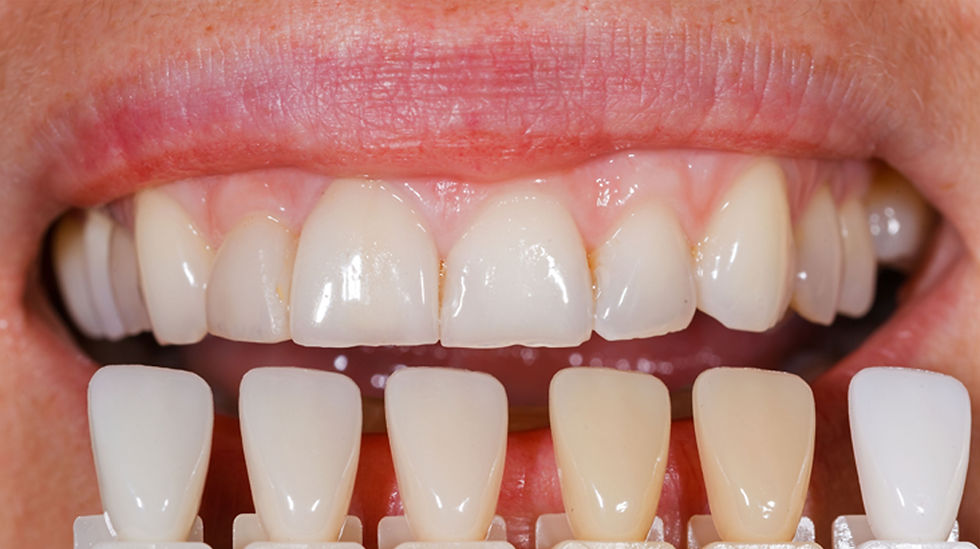
3. Shade Tab posiitoning.
To give the technician the most useful information, it is best to position the shade tab(s) in the correct position.
1. Incisal edge to incisal edge of the shade tab.
2. Keep the facial plane of the teeth parallel to the facial surface of the shade tab.
3. Do not hold the guide outside of the mouth or lingual of the teeth.

4. Lighting for your shade taking procedures.
Ambient lighting in your room and the light source from the flash are both factors in accurately capturing the shade information.
1. It is important to use full-spectrum, color corrected lighting in your operatory. The
ideal is 5500 Kelvin and 100% on the color rendering index (CRI). It essentially
approximates sunlight at noon, it is the whitest light source and standard by which all other
light sources are measured.


Florescent lights - Vita-Lite fluorescent lights are available for most fixtures that have
a rating of 5,500° Kelvin 97% (CRI).
LED Lights - One brand is Vita Lites are available in LED that have light output of
5,500 Kelvin, and 91% CRI.
*Vita Lites in both LED and fluorescent color-corrected lights whether fluorescent or
LED are more expensive than non-color corrected lights, but will facilitate much more
accurate shade selections in your operatories.
Photography Flash Light
This artificial light source is the closest to sunlight. It has a CRI of 100% and a
temperature of 5,600°K (slightly bluer than sunlight).
2. Wall color is critical, use neutral grey, and light blue/grey color. Avoid dark colors,
intense wall colors of any kind will reflect onto the tooth surface and create incorrect
shade.
3. Make corrections to minimize flash bounce back is essential.
a. Recommend ring flash or dual point flash (with diffuser). Use defuser on
flash.

1. Use some sort of defusing shields over the flash to reduce glare.
This can be as simple as using paper taped over flash or by using plastic defusers
that mute your flash.
5. Capture image of the prep shade.
Today when the majority of restorations are all-ceramic; it is very important to consider what effect the remaining prep color will have in the cemented restorations final shade in the mouth. It is for this reason that it is imperative to capture a prep shade in a photo as well. The most commonly used prep shade guide is Ivoclar’s Natural Die Material Guide.

This will allow the lab to create a prep-shade die that will be used inside the restoration to fine-tune and check the out-bound shade in the lab.

The most important aspect of shade communication with your lab is RELATIONSHIP. Developing an open two-way communication loop with a knowledgeable dental lab technician will go a long way to increase your patient’s satisfaction and WOW factor - Increasing patient referrals and your bottom line.

Written By David French
Den-Tech Lab, Monrovia, CA


Comments